With coaching soccer drills for u10, you want to try and build on their previous skills and techniques using competitive fun games.
At this age group they will be playing smaller-sided 7v7 games so there is still a big focus on ball mastery and 1v1 dribbling skills.
Getting lots of repetition of soccer skills is key when coaching this age group however that should be a larger amount of pressure from game realistic scenarios so they can learn how to use those skills in games.
You will also want to start incorporating more soccer drills for u10 that include working together as a team so they will start thinking about their positioning and their roles when attacking and defending.
Download these soccer drills for U10 as a PDF at the bottom of the page
For each of these soccer drills for u10, you will have an understanding of the purpose of the drill, the setup, the instructions, coaching points, questions to ask players, and progressions accompanied by a video of the drill.

20 Of The Best Soccer Drills for U10
Dribbling drills
Dribbling is a fundamental soccer skill and players must continue to build on their ball mastery foundation.
These soccer drills for u10 will focus on developing their 1v1 skills to beat and turn away from defenders, close control and dribble at speed all with an increased amount of pressure.
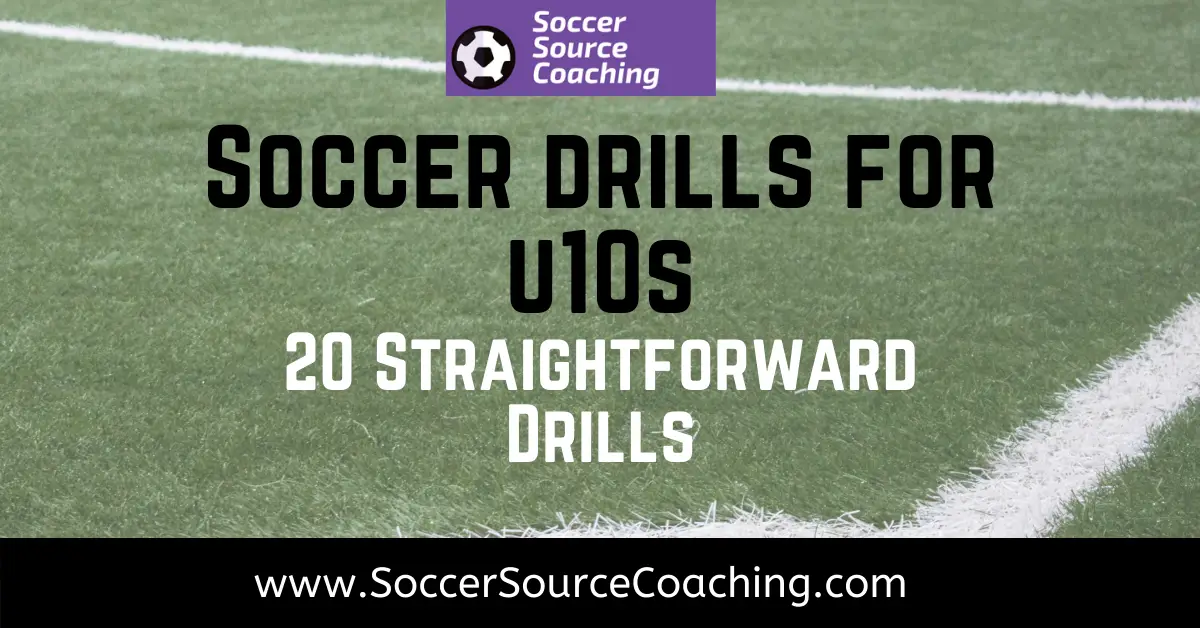
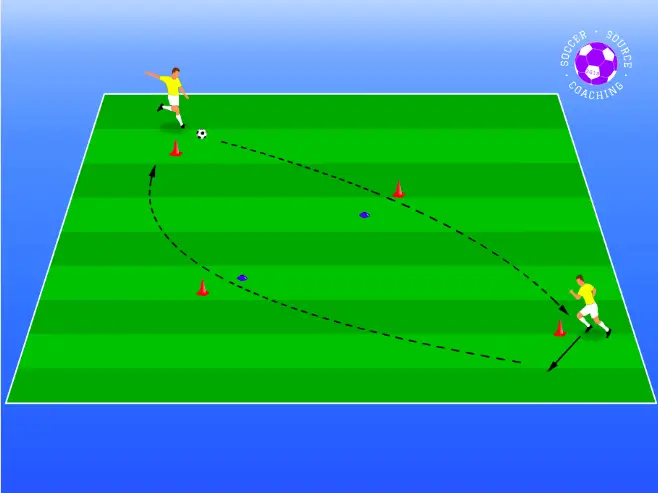
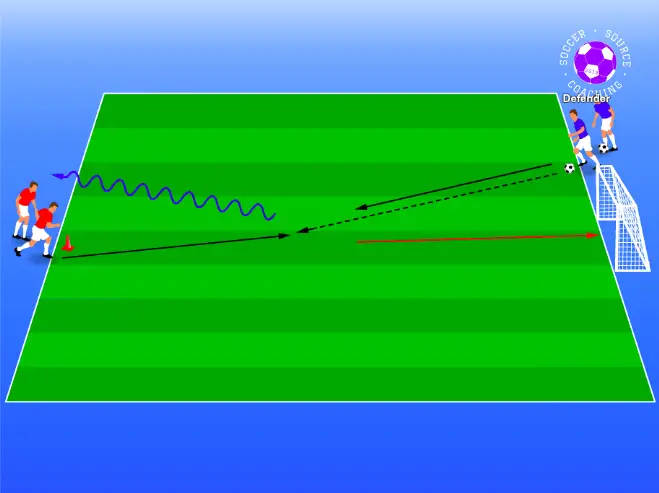
Catch me if you can u10 dribbling drill
Purpose:
The purpose of this dribbling drill is to promote close control and quick changes of direction while under pressure from a defender.
Set up:
- create a 5×5-yard box
- 1 soccer ball per player
Instructions:
Coaching points:
- Small touches when going around corners
- Bigger touch and accelerate when coming out of corners
- Keep your head up.
Questions that can lead to coaching points:
- When do we need to have close control of the soccer ball?
- When is a good time to speed up?
- Where should I be Looking?
Progressions:
- Move around the square while performing boxes, toe taps, or, the soles of the feet.
- 1 player becomes a tagger without a soccer ball and must tag the player with the ball, players can travel in any direction around the square.
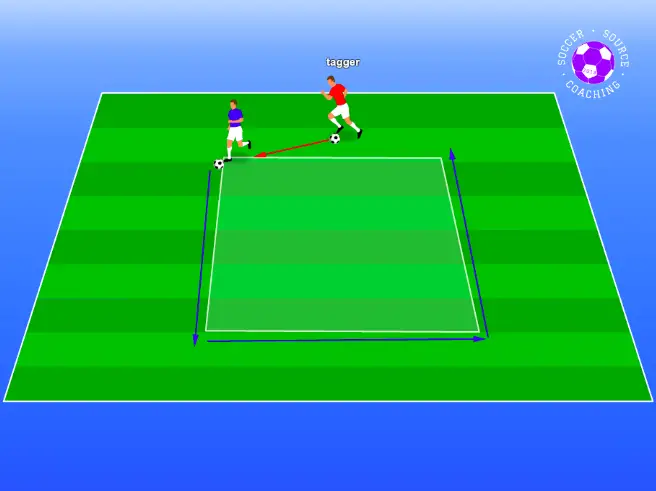
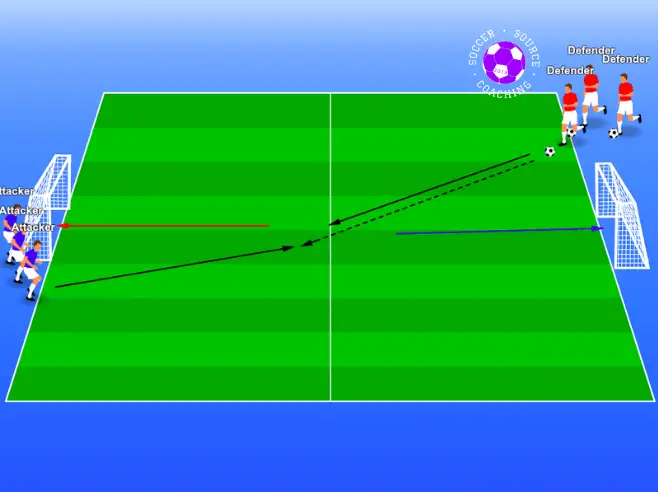
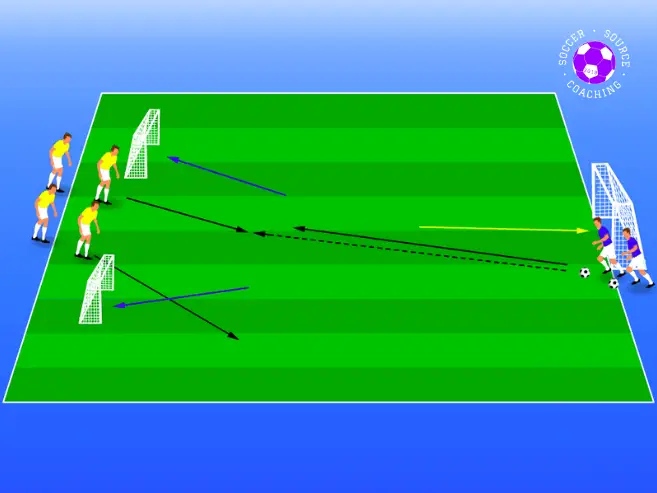
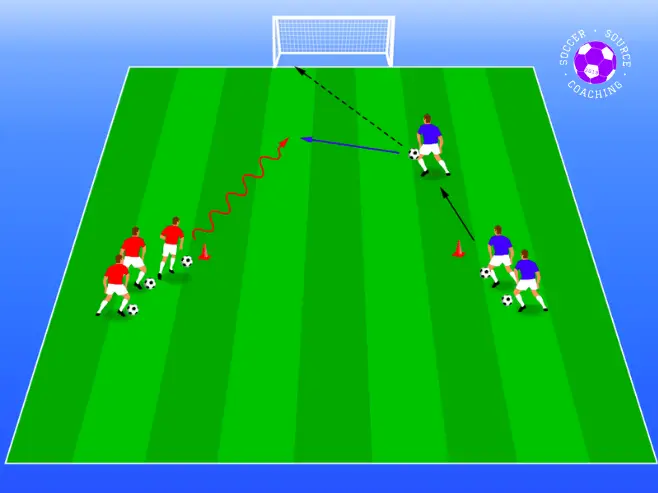
1 defender 3 gates – Soccer drills for u10
Purpose:
This is used to help improve players’ ability to get past a defender, using skills, body position, and changes of speed and direction.
It will also help players process decisions quicker and execute them effectively
set up:
- Create a 10×15 yards area
- 3 gates made up of cones
- 1 goal
- 1 ball per 2 players
Instructions:
Set the gates up in the corners and in the middle of the 10-yard line then set up a goal in the middle of the opposite 10-yard line.
The defender will start with a soccer ball at the end with the 3 gates and pass the ball to the attacker.
The attacker has to try and dribble through either of the gates and if they do this they will get 3 points, if they can just dribble past the line without going through a gate they will get 1 point.
If the defender wins the soccer ball they can score the goal and get 1 point.
Coaching points:
- Use a skill or your body shape to convince the defender to go in one direction
- Accelerate into space when you see an opening
- Beware of where the space is to dribble into
Questions:
- How can I make the defender think we are going in one direction?
- What should I do when I see an opening to dribble into?
- How do I know where the space is?
Progressions:
- Make the area smaller
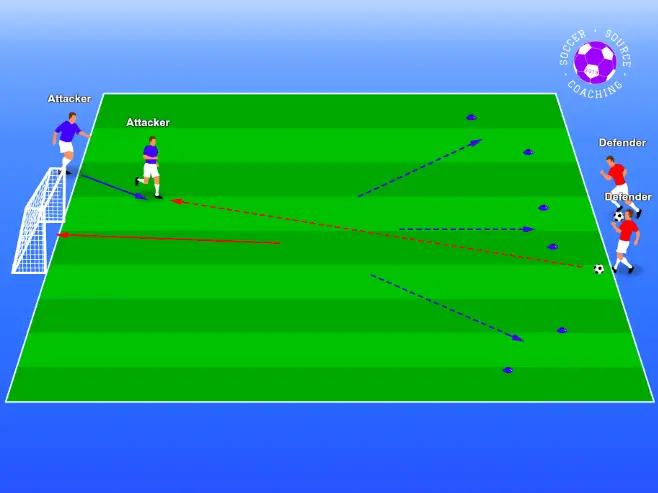
Back to goal u10 dribbling drill
Purpose:
This is to improve a player’s 1v1 ability when the pressure is behind them instead of in front of them, this kind of pressure often gets ignored as coaches will often only focus on dribbling sessions where the player is in front of them.
Set up:
- create a 15×20-yard area
- a cone to mark the middle
- 1 ball per 2 players
Instructions:
Get your players into pairs with one being the attacker and the other being the defender.
Both players will start in the middle facing the same way with the defender behind the attacker and the attacker with the ball.
The attacker must try and dribble past the line that they have their back to, if they do this they will get 3 points.
If the defender manages to win the ball and dribble past the opposite line then they get 1 point.
Coaching Points:
- Use your body to protect the ball
- Use a skill or a turn to create space for yourself
- If you can’t beat the defender, get yourself in a position where you are facing them.
Questions that lead to coaching points:
- What can I use to stop the defender from getting the ball?
- How can I create space for myself?
- If I cannot beat the defender, what should I do next?
Progressions:
- Add a time limit to the attacker so they have to play quicker
Click here for the full session plan for this drill
1v1 Dribbling – Soccer drills for u10
Purpose:
This going to be the most game realistic, you can change where the attacking goal is placed so the attacker has to adjust and change their dribbling approach.
Set up:
- Create a 10×15 area
- 2 goals
- 1 soccer ball per 2 players
Instructions:
Set up the goals opposite each other on the 10-yard lines and divide your players into attackers and defenders.
The defender will start with the ball behind their goal and pass to the attacker on the opposite side.
This will become a 1v1 with the attacker trying to score the goal, if they manage to score they will get 3 points.
If the defender steals the ball they can score in the opposite goal and receive 1 point.
Once the phase of play ends the next defender will pass the ball to the next attacker.
Coaching points:
- Small touches when approaching the defender
- Quick skill with a change of direction to beat the defender
- Big touch into the space and accelerate away from the defender.
Questions that lead to coaching points:
- What type of touches do I want as I approach the defender?
- How can I get past the defender?
- What should I do after I have performed my skill and change of direction?
Passing drills
Passing is a huge part of soccer and the passing technique is easy to coach but what coaches often forget about is all the decision-making and body position that should be coached alongside the passing technique.
These drills soccer drills for u10 are going to focus on body position when receiving a pass, first touch, and when/who to pass to.
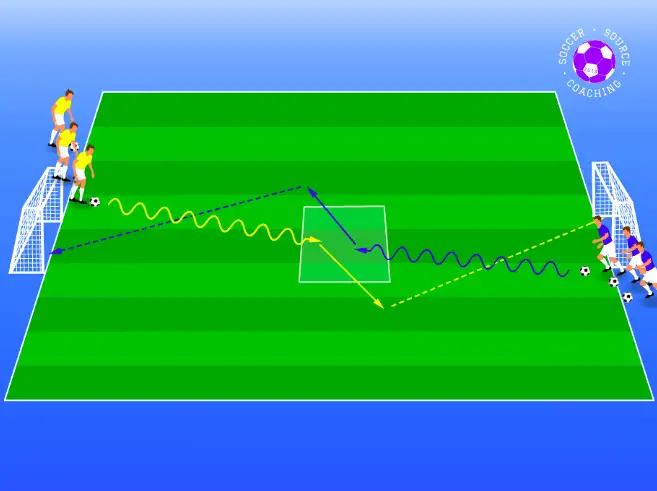
Simple First touch and passing u10 drill

Purpose:
This is to get lots of repetition of different types of first touches players can take and build a solid foundation for other passing drills.
Set up:
- 3 cones per pair
- 1 Soccer ball per pair
Instructions:
Set up your cones in a straight line roughly a yard in length and place your 2 soccer players on either side of the coned line.
The players must pass the ball to each other alternating from left to right however it must stay on the outside of the cones.
When a player receives the ball they must run parallel to the coned line and pass to their teammate on the other side.
Players can start by using the inside of their back foot to take the touch and pass.
Challenge players to control the pass and pass the soccer in as few touches as possible
Coaching points:
- You should be side on when receiving the ball
- Your chest should be facing the direction you want to take the touch
- Stay light on your feet
Questions that can lead to coaching points:
- How should you be standing when you’re waiting to receive the ball?
- Which was should I be facing?
- What can I do to help easily adjust to a pass?
Progressions:
- Still using the back foot you use the outside of the foot instead of the inside
- Receive the ball facing your partner and you can try and use a back-heel touch to the side.
Click here for the full session plan for this drill
Rondo passing square – Soccer drills for u10
Purpose:
The purpose of this is to get players to focus on their first touch and movement to help support the player on the ball.
Set up:
- Create a 6×6 yard box
- 1 soccer ball per 4 players
Instructions:
Set up your square and divide your team into 1 defender and 3 attackers.
the 3 attackers must stay on the outside of the square and keep possession of the ball.
The only rule is that the player on the ball can only pass to the players standing on the left or right of him not opposite from him.
The defender must try and win the ball back if they do they swap with the attacker who lost the ball.
Coaching points:
- You should receive the ball in an open-body position
- Your first touch should take you away from the pressure
- The player on the ball should always have 2 options
Questions that can lead to coaching points:
- What is the best position to receive the ball? How? Why?
- Where should my first touch take me?
- If I don’t have the ball what should I be thinking/doing?
Progressions:
- Limit the number of touches
- Make the area smaller.
Receiving and passing on the back foot soccer drill
Purpose:
The purpose of this drill is to get a lot of repetition for creating an angle to receive the pass, receiving the ball in an open body position, using a backfoot touch, and playing a pass to a teammate.
Set up:
- Create a 10×10 yard area
- 1 soccer ball per 2 players
- 8 players
Instructions:
After you have set up your area divide your players into 2 groups, 1 group on the inside and the other group spread out each on a different line.
The players on the outside will start with the ball.
The players on the inside will create an angle to receive the ball in an open body position and receive the ball on the back foot taking a touch into space.
They play a pass to a player who is free on the outside and look to receive a pass from a different player on the outside.
Ask players to keep track of how many times they received the ball and the player who received it the most will be the winner.
Coaching Points:
- Check your shoulder before you create an angle
- Create an angle where you can see where the ball is being passed from and see the space you are going to move to (open body position)
- Receive the ball on the back foot and take a touch into the space.
Questions to ask that can lead to coaching points:
- What should I do before creating an angle? why?
- What position should I get myself into to receive the ball?
- Where should my touch take me?
Progression:
- 1 of the players in the middle can hold a pinny and become a defender. If they successfully steal the ball they give the pinny to the player from who they stole the ball.
Passing in pairs u10 soccer drill
Purpose:
This is to help give players a tactical understanding of passing and learn how to apply in-game scenarios.
Set up:
- Create a 15×20 yard area divided into vertical thirds
- 2 goals
- 1 ball per 2 players
Instructions:
Divide your area into vertical thirds and place goals at either end of the area.
The players will work in pairs and have one ball between them, together they must try and score as many goals as they can.
Once they have scored one goal they will collect the ball and try to score in the other goal.
The only rule is that to move from section the ball must be passed between teammates and you can only score from the final third on the goal you are facing.
Coaching points:
- Create an angle to receive the pass
- The pass should be played in front of your teammate so they can run on it
- Use your back foot to take a positive first touch into the space
Questions that can lead to coaching points:
- How can we create an option for our teammate on the ball?
- If you have the ball where should you place your pass to your teammate?
- How should we receive the ball and where should we take our touch?
Progression:
To make this harder you can introduce a defending pair that stays in the middle section and if they win the ball they can leave the section and score in either of the 2 goals.
The pairs will still be having to try and score as many goals as possible however be warier of the defenders in the middle sections.
Shooting Drills
These shooting soccer drills for u10 are going to be used to start focusing on a proper striking technique using the laces and also how passing the soccer ball into the corners can be just as effective too.
Soccer shooting in pairs – Soccer drills for u10
Purpose:
The purpose of this shooting drill is to focus on the player’s technique and accuracy using both feet.
Also more often than not most of the time spent in shooting drills is used collecting soccer balls, as players are standing opposite each other shooting at the goal in the middle players can easily collect the ball.
Set up:
- Create a 15×20-yard area
- Cones to create goals and gates within the goals
- 1 soccer ball per pair.
Instructions:
Set up goals with cones in the middle of the area going horizontally, they should be about 6 yards in width with cones placed a yard inside of the goal on each side.
The players will take turns shooting at the goal, if a player scores a goal in the larger middle gate they will get 1 point.
If the player manages to score in the smaller gates located in the corners they will get 3 points and if they manage to score with their weaker foot their points get doubled.
Set up a marker so they don’t get too close to the goal.
Coaching points:
- Use the laces or the inside of your foot
- Aim for the corners
- Standing foot should point toward the goal, level with the ball when you shoot it.
Questions that can lead to coaching points:
- What part of the foot should we be using?
- Where is the hardest part of the goal for the keeper to reach?
- What position should my standing foot be in taking a shot?
Progressions:
- Move the marker close to focus on accuracy with the inside of the foot
- Move the marker further back to focus on power.
Combination of u10 soccer shooting drill
Purpose:
This is to help players take a shot when the soccer ball is passed out in front of them to run onto. This shooting drill lets the players get lots of repetition and practice with different angles.
Set up:
- Create a 15×20-yard area
- 1 goal
- 1 soccer ball per pair
- Cones
Instructions:
Set up your goal in the middle of the 20-yard line with cones placed 1 yard inside to make gates.
Roughly 10 yards back from the goal make a line of cones ( 1 cone per pair of players) that runs parallel to the 20-yard line.
The players will need one soccer ball in the pair and they will stand facing opposite each other.
The player with their back to the goal will start with the ball and pass it to their partner, the partner will pass the ball in front of them to run on and take a shot at the goal.
If the player scores a goal they get 1 point, however, if they manage to score through the gates they will get 3 points.
Coaching points:
- Aim for the corners
- Use the inside of your foot for accuracy
- Use both feet
Questions that can lead to coaching points:
- Where you should be trying to aim?
- What part of the foot can we use for accuracy?
- Should I just be using my stronger foot
Progression:
- When the player play has played the pass they can then apply pressure as a defender making a recovery run
Shooting rotation u10 soccer drill
Purpose:
The purpose of these drills is to help improve players shooting and finishing when there is a goalkeeper.
Set up :
- 1 Goal
- Create a 15×20-yard area
- 1 soccer ball per player
Instructions:
Set up your goal in the middle of the 15-yard line with your players lining up behind a cone 15 yards away each with a soccer ball.
The first player will dribble and score a goal in an empty net.
As soon as the player has taken their shot they will become the goalkeeper and the next player will start dribbling towards the goal to try and score.
Regardless of whether the player who just shot scored or missed they will always become the goalkeeper.
Every time a player scores they get one point.
Coaching points:
- Accelerate towards goal
- Small touches when you get closer to the goalkeeper
- Aim your shot in the corners
- Keep your head up
Questions that can lead to coaching points:
- If the goalkeeper is out of position do I want to go fast or slow?
- What kind of touches should I take I get closer to the keeper?
- Where should I be aiming my shot?
- How do I know where the keeper is?
Progression:
- Change where the attackers start so they will have to think about beating the goalkeeper from a different angle
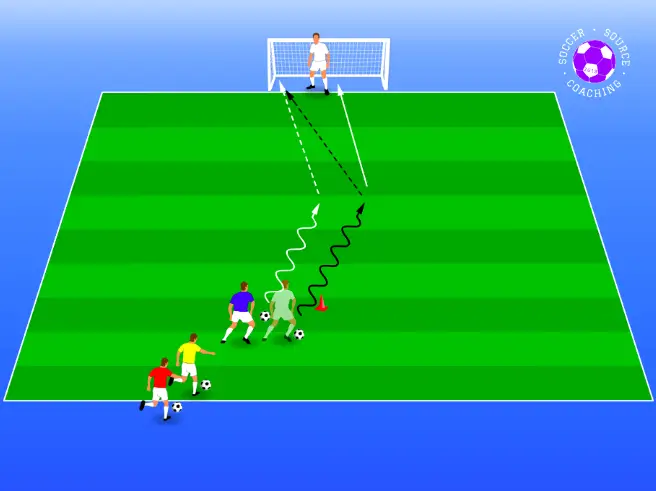
The skill then Shoot u10 soccer drill
Purpose:
The purpose of this shooting soccer drill is to get players to perform skills to create space for them to shoot at a goal
Set up:
- Create a 15×20-yard area
- 2 goals
- 4×4 yard square in the middle
- 1 ball per player
Instructions:
Set up your 2 goals with cones a yard inside of each post opposite each other on the 15-yard lines and create your 4×4 yard box in the middle of the area.
Divide your players into 2 equal lines starting on either side of the goals with a soccer ball each.
The first player from each line dribbles into the square and first performs a skill that fakes to go to the left and takes them to the right.
Their touch should take them out of the right-hand side of the square
Once they have had their touch to the side they should shoot as early as possible aiming for the corners
If the player takes a shot and it goes through the gate they will get 3 points if they score a goal without doing this then they get 1 point.
Once they have had their shot they will collect their soccer ball and join the line next to the goal they had their shot on.
Coaching points:
- The skill should be performed fast with a quick change of direction
- A big touch into the space to create the space for the shot
- Aim your shots towards the corners of the goal using the inside of your foot or the laces
Questions that can lead to coaching points:
- What should our skill look like to get away from a defender?
- What can we do so we can take a shot as early as possible?
- Where should we be aiming our shots?
Progression:
- Introduce a defender into the middle, if the defender wins the ball they score in either goal.
Attacking drills
You should start introducing attacking drills so that your players can start understanding how to support their teammates off the ball when going forward and trying to score goals.
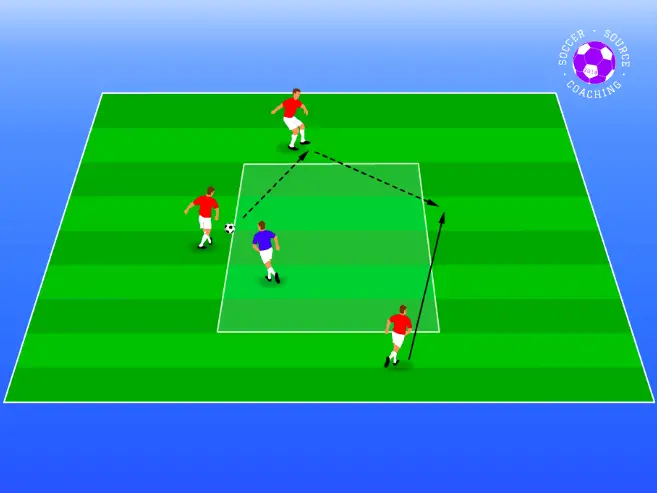
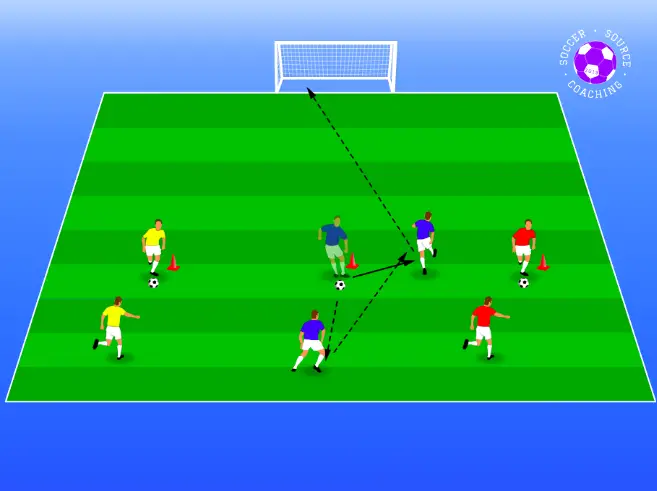
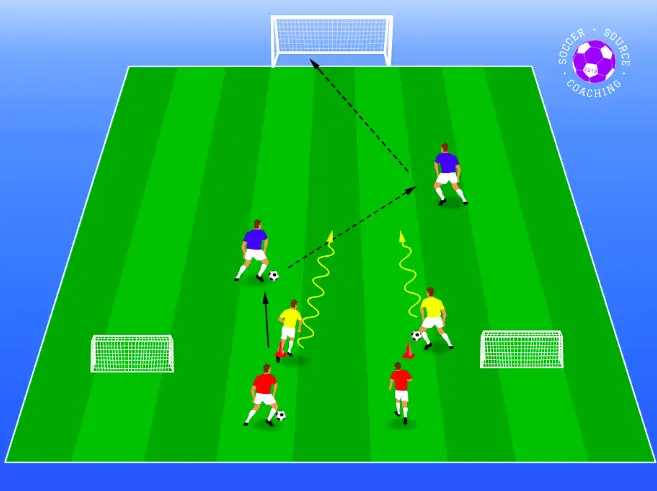
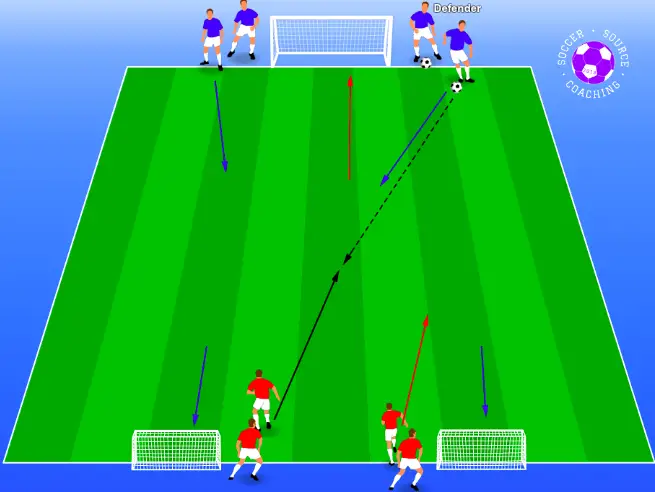
Attacking 2v1 u10 soccer drill
Purpose:
This is an introduction to how you work together as a pair to score a goal, the pressure is not that high but it still allows players to be successful and also learn from their mistakes.
Set up:
- Create a 15×20-yard area
- 1 large goal and 2 smaller goals
- 1 soccer ball per 3 players.
Instructions:
Create your area and set up a goal in the middle of the 15-yard line.
On the opposite line place 2 smaller goals in the corners.
The defenders will line up next to the large goal and pass the ball to the attackers who are waiting for the opposite.
Once the pass has been played the defender can pressure the attackers.
The attackers must work together to try and score in the large goal, if they score they will get one point.
However, if the defender wins the ball back they can score the 2 smaller goals and get 1 point.
As soon as the phase of play ends the next attackers and defenders can go.
Coaching points:
- Create an option for your teammate out wide and in space
- If you have the ball drive into the space
- If you have the ball play a pass in front of your teammate
Questions that can lead to coaching points:
- Where can you go to be an option for your teammate?
- If you have the ball and see space in front of you what can you do?
- When you pass to your team where should the pass be?
Progressions:
- Make the area smaller
- Add another defender
Counterattacking in pairs – Soccer drills for u10
Purpose:
This helps encourage players to attack quickly and improve their decision-making on the ball.
Set up:
- 1 Goal and 2 smaller goals
- 15×20 yard area
- 1 soccer ball per pair
Instructions:
Create your area and set up a goal in the middle of the 15-yard line and line your players up in pairs on the opposite line with 1 soccer per pair.
The 2 small goals should be on this line in corners where the 20-yard line meets the 15-yard line.
The first pair will combine passes and score on an empty goal.
Once they have scored a goal or missed they will become the defending team and the next attacker team will go.
If the defenders win the ball they can score the 2 small goals.
But at the end of the phase of play, the attacking team will always become the defending team.
Coaching points:
- Attack quickly
- Be confident on the ball and drive into space
- Don’t let the defenders reorganize
Questions to ask that can lead to coaching points:
- Do we want to attack fast or slow?
- What can we do if we see space in front of us?
- What happens if we let the defenders reorganize?
Attacking combination passes u10 drill
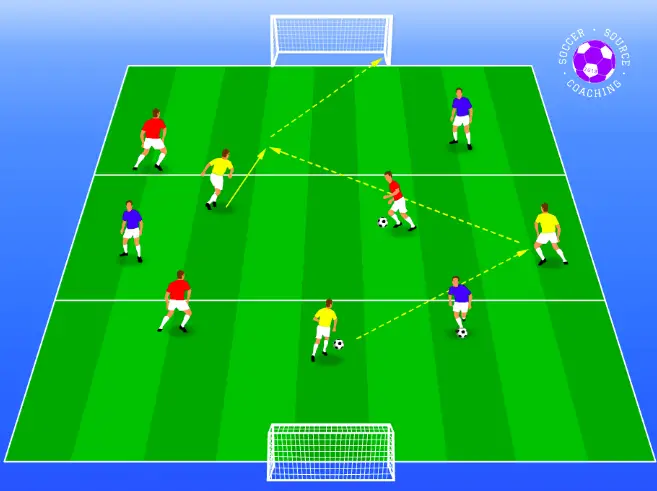
Purpose:
The purpose of this soccer drill is to get players thinking 2 passes ahead and to try to anticipate the play, focusing on movement off the ball to support the attack.
Set up:
- create a 15×20-yard area
- 2 goals
- 1 soccer ball per 3 players
Instructions:
After you have set up the area place the 2 goals opposite each other on the 2 15-yard lines and divide the area into vertical thirds.
Split your players into teams of three and give them one ball in their group.
They must work together to try and score as many goals as they can. Once they have scored 1 goal they must try and score a goal on the opposite end.
The only 2 rules are that to get from area to area the ball must be passed forward and all players must be involved in the phase of play that leads to a shot on goal.
The team that scores the most goals is the winner
Coaching points:
- Use of the whole width of the area
- Passes should be played in front of teammates
- If you don’t have the ball think about you can go to receive it
Questions that can lead to coaching points:
- When we attack do we want to be spread out or close together?
- Where should the passes be played to our teammates?
- Where can you go to help support your teammate on the ball?
Progressions:
- Add 1 defender to each of the sections, if the defender wins the ball they can score in the goal they are closest to.
Attacking from wide areas u10 drill
Purpose:
This soccer drill will help encourage players to get the ball and create opportunities to score from wide positions.
Set up:
- Create a 15×20-yard area
- 1 large goal 2 small goals
- 1 ball per 5 players
Once you have set up your area create 2 channels 2 yards in that run parallel to the 20 yards lines. This will create 2 wide-area channels.
Set up a goal in the middle of the 15-yard line and 2 smaller goals on the opposite side in the corners.
This will be a 3 vs 2 in the attackers’ favor with the defenders starting with the ball.
The defenders will start the phase of play by passing the ball to the attackers, the attackers must try and score in the large goal.
If the attackers manage to score a goal they will get 1 point, however, if they can receive the ball in either of the channels and score in that phase of play they will get 3 goals.
If the defenders win the ball back they can score in the 2 smaller goals for 1 point.
Coaching points:
- Create angles for players in the wide-area to go forward and backward if you don’t have the ball
- Spread out and use the width of the area
- As soon as you pass the ball you should be moving again to support the phase of play
Questions that can lead to coaching points:
- Where can I go to help support the wide player on the ball?
- Should we be close together or spread out when attacking?
- As soon as I pass the ball what should I be thinking next?
Defending Drills
These defending drills will help players develop their ability to defend 1v1 but also help them how to start defending in pairs.
Defending 1v1 u10 drill
Purpose:
The purpose of this soccer drill is to help players control where the attacker goes and force them into a mistake.
Set up:
- Create a 5×10-yard area
- 1 small goal
- 1 ball per pair
Instructions:
Set up your area and place a goal in the middle of one of the 5-yard lines.
The defender will start with the ball next to the goal and pass the ball to the attacker who will start on the opposite side.
The attacker must try and score a goal, if they do they will get 1 point.
If the defender can steal the ball and dribble past the line the attacker started on then they will get 3 points
If they force the soccer ball out of bounds the defender will get 1 point.
Coaching points:
- Side-on body position with knees bent
- 1.5 yards away from the attacker at all times
- Your body should be facing the direction you want to show the attacker.
Questions that can lead to coaching points:
- What body position should we be in when were are defending 1v1?
- How far away should I be from the attacker?
- Where do I want to show the attacker and how I can do this?
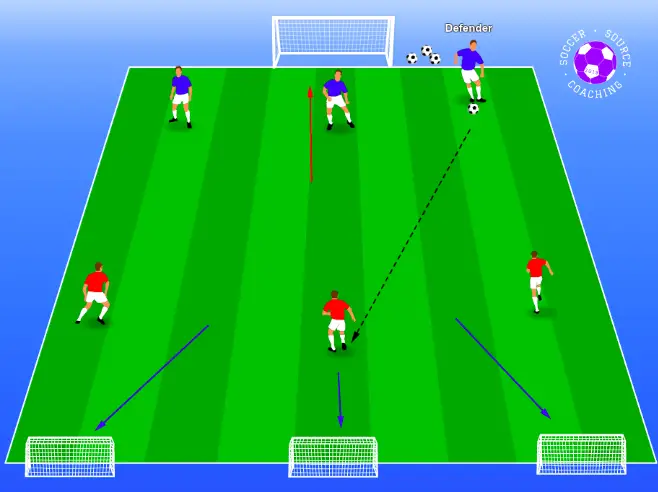
1v1 defending transition u10 soccer drill
Purpose:
This helps players react and organize quickly when they lose the ball or if there is a turnover in possession.
Set up:
- create a 15×20-yard area
- 1 goal
- 1 soccer ball per player
Instructions:
Create your area and place the goal in the middle of the 15-yard line.
Divide your players into 2 teams and line up in the corners to the opposite side of the goal.
Each player will have a soccer ball.
A player from one of the lines will start and score on an empty goal, as soon as the player has taken their shot they will become the defender for the player from the next line.
As soon as the defender wins the ball, a shot is taken or the ball goes out of bounds the attacker will become the defender.
The team that scored the most goals will be the winner.
Coaching points:
- Pressure quick
- Show the attacker away from the goal
- Don’t Dive in
Questions that can lead to coaching points:
- Do we want to give the attacker time and space?
- Where do we want to show the attacker?
- What happens if I dive in?
Progression:
- Make the area smaller so it becomes easier for the defender or makes the area larger so it’s harder for the defender.
Defending in pairs u10 drill
Purpose:
This is to help give players a better understanding of how to work in pairs, deciding who pressures and who covers.
Set up:
- Create a 15×20-yard area
- 3 goals
- 1 soccer ball per 4 players
Instructions:
After you have created your area set up a goal on the 15-yard line and 2 goals in the corner of the opposite 15-yard line.
The defenders will start on the side with one goal with a soccer ball and begin by passing the ball to the attackers.
The attackers must try and score a single goal, if they do they will get 1 point.
However, if the defenders can steal the ball and score in either of the opposing 2 goals they will get 3 points.
If they steal the ball and it goes out of bounds they will get 1 point.
Coaching points:
- The defender closest to the attacker with the ball will pressure them
- The other defender will cover behind the player cover.
- Communicate.
Questions that can lead to coaching points:
- which player should pressure the attacker?
- If you are not pressuring the attacker where should you be?
- How can you make it easier as a pair to stay organized?
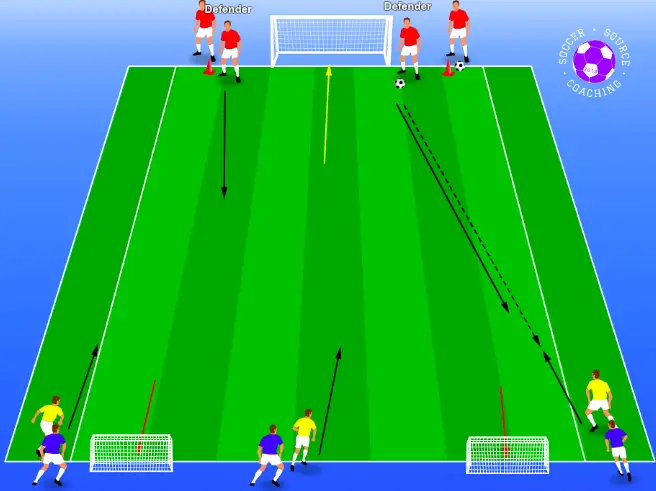
Defending as a 3 u10 drill
Purpose:
This can be used to build on the previous soccer defending drill and this would be more game realistic.
Set up:
- Create a 20×25-yard area
- 1 soccer ball per 6 players
- 1 large goal 3 small goals
Instructions:
Set up your area and place the large goal in the middle of the 20-yard line and 3 goals on the opposite 20-yard line with one in the middle and 1 in either of the corners.
The defending team will set up as 2 defenders and a center midfielder and the attacking team will set up as 1 striker, a right midfielder, and a left midfielder
The defending will start with the ball next to the single goal and pass the ball to the attackers.
The attackers must try and score in a single goal, if they do then they will get 1 point.
If the defenders manage to steal the ball and score the opposing 3 goals they will get 3 points, if they manage to steal the ball and it goes out of bounds they will only get 1 point.
The defenders will always start with the ball when the ball goes out of bounds.
Coaching points:
- Force the attackers away from the goal
- The defender closest to the attacker with the ball pressure.
- Communicate
Questions that lead to coaching points:
- Where should you be showing the attackers?
- Who pressures the attacker with the ball?
- How can you effectively stay organized?
Comment and share these Soccer drills for u10
Use soccer drills for u10s to work on every aspect of soccer within. your team If you have any other drills that you have used for u10 soccers then please leave a comment.
If you know a coach that would find these U10 soccer drills useful then please share the drills with them using the social media buttons.
Thank you,
Toby.
Related Posts:
- 10 Drills That Teach Spacing
- My 10 Favourite Rondo Variations
- 11 Shooting and Finishing Drills
- 10 Defending soccer drills for a rock-solid defense
- 20 Soccer Drills for u12
The Youth Soccer Coaching Handbook
Take the stress out of coaching youth soccer with 250+ pre-made soccer sessions and drills, just turn up and coach!
Here’s the breakdown of what you’ll find inside:
- 35 Defending Drills
- 35 Dribbling and 1v1 Drills
- 21 SAQ Drills
- 47 Passing, Control, and Possession drills
- 31 Goalkeeper drills
- 36 Shooting and Finishing drills
- 30 Soccer Games U4 – U8
- 20 Pre-made soccer sessions (90 minutes in length each)
2 thoughts on “Soccer drills for u10 | 20 ESSENTIAL Drills”
Comments are closed.